Vulnerability Management in Microsoft Azure: Azure VM Guide
Updated 26 October 2026 • 22 February 2024

From the team building NubOps — Automated Azure architecture diagrams, security audits, and vulnerability tracking. Try the live demo →
This article focuses on how you can use the native tools in Azure, and how an organization can establish a basic process for vulnerability management regarding virtual machines for vulnerabilities that can’t be fixed by just doing the standard automatic update management in Azure.
Vulnerability management is the process of detecting, assessing, prioritizing, mitigating, and reporting on security vulnerabilities that exist within an organization’s technical platform as well as within the software they develop. Cloud Service Providers are responsible for doing this for resources that are created by using a Platform-as-a-Service (or serverless) offering. Cloud customers, however, are responsible for vulnerability management if they use an Infrastructure-as-a-Service offering. In the case of Microsoft Azure, this means that organizations running Azure virtual machines (VMs)—whether Windows or Linux, as well as hybrid machines connected as Azure Arc-enabled servers—are responsible for assessing and patching those machines themselves.
Azure includes native tools such as Azure Update Manager, Microsoft Defender for Cloud (formerly known as Azure Security Center), Microsoft Defender Vulnerability Management, Azure Resource Graph, Log Analytics, and Azure Monitor Workbooks. These tools are used together to assess vulnerabilities against the Microsoft cloud security benchmark, prioritize findings using the Common Vulnerability Scoring System (CVSS), apply operating system and software updates, and verify remediation so that an organization can minimize the window of opportunity for attackers. Most of the tools mentioned are available in the Azure portal, but in some cases, you might want to extract information using their corresponding Azure API—either to automate workflows, or to create a holistic overview of what your security posture really is.
Governance (system management) of solutions based on virtual machines (VMs) includes change management, which consists of performing minor updates and major upgrades. A minor update would be to change the software version from 1.1.0 to version 1.1.1, while a major upgrade would be a change from version 1.1 to version 2.0. A major upgrade represents a significantly greater risk, requiring more testing and verification to ensure the change doesn’t have a negative impact on an application’s functionality or availability. This is required to be done manually as new vulnerabilities are continuously discovered in all software. The challenge here is that if a high risk vulnerability is discovered in software, and a major upgrade is required to solve it, then that might take a long time for a vendor to fix. Minor updates can usually be remediated in a shorter time.
Automated Patch Management vs. Manual Patching
Microsoft Azure virtual machine patching combines Azure Update Manager for scheduled Windows updates and security patches with manual patching for frameworks and third-party software whose upgrades can disrupt dependent applications, require vendor validation, or risk leaving unsupported software in use when upgrades are never applied.
| Approach | Best suited to | Key consideration |
|---|---|---|
| Automatic patch management | Scheduled Windows updates and security patches for Azure virtual machines | Organizations can use separate patch groups and schedules to test patches in non-production before production deployment. |
| Manual patching | Frameworks such as .NET, .NET Core, and Node.js, plus third-party software | Updates require testing because application dependencies or vendor support can make an upgrade unsafe or unsupported. |
The standard approach to Azure vulnerability management is to use the Azure Update Manager to schedule Windows updates and security patches to be installed automatically. Microsoft releases the majority of these updates on the second Tuesday of each month, commonly known as “patch Tuesday”. Organizations usually create “patch groups” based on separate schedules. One patch group for non-production servers, and another for servers in production environments for example. Using different schedules allows organizations to install patches in the test environment first, and then to production if everything went well during testing. Some also want to wait a few days to initiate patching, just to avoid installing a patch that has caused technical issues for other organizations. Performing automatic updates this way ensures that security patches are installed as soon as possible, and it’s the easiest way to ensure that the majority of new vulnerabilities are remediated (fixed) automatically each month.
Some software components still require manual patching since automatically patching them can cause unforeseen technical issues for applications that depend on them. This especially concerns frameworks like .NET, .NET Core and Node.js. In practice, frameworks can’t be automatically patched due to the large number of software dependencies they have. For example, upgrading these frameworks automatically could cause a Line-of-Business (LOB) application to fail if that application’s vendor hasn’t ensured that it’s possible to upgrade without causing issues. Since third-party software often requires manual updates, this means that it can lead to software becoming “unsupported” if it’s never updated. This is referred to as End-Of-Support software, and it usually means that the software vendor ceases to provide support and security updates for it.
As a result of manual patching being required, organizations have to track which changes need to be done manually each month. This also includes having to ensure the patch actually remediates the vulnerability it’s supposed to fix. In cases where the vulnerability can’t be immediately remediated, it’s necessary to find ways to mitigate the risk in other ways to make an exploit of that vulnerability less likely. Mitigation is implementing some form of compensating controls. It can be to block Internet access to and from a system, restricting users from accessing an application without MFA, or to place VMs in a dedicated subnet with a Network Security Group (NSG) attached to it.
Advantages and Limitations of Automatic vs. Manual Patching for Azure VMs
| Patching model | Practical advantages | Practical limitations |
|---|---|---|
| Automatic patching (Azure Update Manager) |
|
|
| Manual patching |
|
|
What Azure Update Manager Manages vs. Vulnerability Assessment
A common point of confusion in Azure VM operations is the difference between patch management (update compliance) and vulnerability assessment. Azure Update Manager is a unified Azure service designed to manage and govern operating system updates for Windows and Linux across Azure virtual machines and Azure Arc-enabled servers. It relies on the native Windows Update Agent on Windows (and native package managers on Linux) to check for missing OS updates, enforce maintenance windows, orchestrate scheduled or on-demand patching, control reboot behavior, and monitor update compliance.
However, Azure Update Manager is not a vulnerability scanner. It does not scan for CVEs in third-party applications, detect End-of-Support runtimes, or evaluate exploitability. That role belongs to Microsoft Defender for Cloud and Microsoft Defender Vulnerability Management, which continuously assess VMs for known software vulnerabilities and misconfigurations.
| Dimension | Azure Update Manager | Defender for Cloud Vulnerability Assessment |
|---|---|---|
| Primary role | Operating system patch orchestration and update compliance management | Vulnerability detection, CVE scanning, and risk assessment across OS and installed applications |
| Supported machines | Windows and Linux on Azure virtual machines and Azure Arc-enabled servers | Windows and Linux on Azure virtual machines, Azure Arc-enabled servers, and multicloud VMs |
| How it operates | Queries the Windows Update Agent or Linux package manager; installs updates via scheduled maintenance windows, automatic VM guest patching, or one-time deployment | Scans VM disks via agentless vulnerability assessment or an installed Defender for Endpoint agent powered by Microsoft Defender Vulnerability Management |
| Key capabilities | Patch scheduling, maintenance windows, pre/post-maintenance scripts, reboot control, and update compliance reporting | CVE identification, CVSS risk scoring, vulnerable software inventory, End-of-Support detection, and Secure Score remediation tracking |
| What it does not cover | Does not scan arbitrary third-party software for CVEs or score vulnerability severity | Does not install patches or manage maintenance windows and reboot schedules |
Security Controls and Azure Security
Security for Azure environments relies on the principles of “Zero Trust”, “Assume Breach”, and “Defense in Depth”. Defense in depth is based on the idea of using multiple layers of security controls to protect an IT system. The National Security Agency (NSA) originally conceived this layering tactic based on the military strategy of the same name. The purpose of this concept is to provide redundancy in the event an individual security control fails. Redundancy in this case could be having provided security awareness training for personnel, physical security, well-defined processes, and other technical countermeasures. Technical countermeasures are security controls that address different aspects of IT security such as authentication, authorization, encryption, network access control, integrity management, vulnerability management, malware protection, and security monitoring. This provides a layered defense according to this principle.
Applying the defense in depth principle to Azure includes using several security related services, configuring resources according to security benchmarks such as the Microsoft cloud security benchmark, and performing security monitoring. This includes configuring security related options in Entra ID to protect user accounts (IAM), implementing network security controls (Azure Firewall, App Gateway with WAF, Azure FrontDoor), configuring additional encryption options based on Customer-Managed Keys stored in a Key Vault, hardening resource configurations, security event monitoring using Sentinel, or applying software security tools to Azure DevOps (such as SCA, SAST, DAST) to ensure source code doesn’t contain different types of vulnerabilities. Hardening operating systems such as Windows using Group Policy is also necessary, but also hardening services such as IIS, SQL Server, etc. A special case worth mentioning is containers which are deployed based on images, such as Nginx for example. Many customize these images to deploy both operating system and services (web servers) into a container app. These images include software that contains vulnerabilities also, which means that the images must be updated so that new and secure containers can be deployed to replace the old and insecure.
Defining a Process for Vulnerability Management
Implementing a security control starts with defining a set of requirements that the organization must adhere to, providing a set of tools that can be used by the staff, that the tools make automation possible, and that the automation makes it possible to review and track Key Performance Indicators or metrics. The last part is necessary to create reports which describe how effective a security control is and how well it’s functioning as a process.
Defining requirements is usually done in a information security policy, standard, or guideline. Requirements should be applicable to both on-premise systems, and to systems running on services provided by a Cloud Service Provider.
Subscribe to our newsletter here, and you’ll receive free access to our Vulnerability Management guideline which includes detailed requirements:
A process can be described as being people using tools to process information with the purpose of achieving a goal. A process for managing vulnerabilities on VMs can consist of the following sub-processes:
- Collect information about installed software
- Collect information on vulnerabilities present in software
- Prioritize security risks based on criticality
- Remediate risks that can be fixed
- Mitigate risks by implementing compensating controls
- Create reports based on current state and trend
- Manage residual risks
These activities are a major part of working with security operations when an organization wants to minimize the risks they are facing. The main goal here is to prevent security incidents that might be caused by hackers exploiting vulnerabilities in software.
Collecting Software Information
Vulnerability management requires you to know what software, and which version, you have installed. This information is particularly important for LOB applications, and any software that’s exposed to the Internet. Many organizations already use a Configuration Management Database (CMDB) that collects information and stores it in a central repository as Configurable Items (CIs).
Another way of collecting information about software that has been on VM’s in Azure is to enable the “Inventory” feature in the Azure portal on VMs. Go to the “Automation Account” you’re using to collect the information and select “Inventory” in the “Configuration Management”. Then click on the “Software” tab to see what’s installed.
This table lists the installed software grouped by name and version, including high-level information like name, version, publisher, last refreshed time, and the number of VMs with that software. Clicking on a row displays details like properties and VM names with the software. You can also search for a particular application or application group by name, version, and publisher.
Using Log Analytics as a Scanning Tool
Log Analytics can query Azure VM software inventory, but it does not independently scan Azure virtual machines for vulnerabilities; Microsoft Defender for Cloud performs vulnerability scanning in the Azure portal, while ConfigurationData and Kusto Query Language help teams identify installed applications, versions, publishers, computers, and resource IDs for analysis.
The information presented in the “Inventory” feature is stored in a Log Analytics workspace in a log table called “ConfigurationData”. This means that it’s also possible to search through the data using the Kusto Query Language (KQL). A simple KQL query could look like this:
1ConfigurationData
2| where ConfigDataType == "Software"
3| where SoftwareType == "Application"
4| where TimeGenerated between (startofday(ago(1d)) ..now())
5| distinct Computer, SoftwareName, Publisher, CurrentVersion, _ResourceId
The log data is also available if you query the Azure Log Analytics API. The URI for the API call is:
“https://api.loganalytics.io/v1/workspaces/{yourLogAnalyticsWorkspaceId}/query”.
Log Analytic workspaces have a unique “Workspace ID”, and you have to have authorization to query them. This API is also based on POST requests, so the KQL query is sent to the API as UTF8 encoded “application/json” content. The response is formatted as a table, so it contains a set of columns (basically just the column names), and then all the rows which contain the actual data.
This means that you can query all Log Analytics workspaces to find out which workspaces have the ConfigurationData log table and then extract the information you need.
Collecting Vulnerability Information
Vulnerability management requires you to quickly act on issues that are continually changing in an effort to minimize an attacker’s window of opportunity. The default way of finding vulnerabilities on VMs is to use the Azure portal. In Azure, vulnerability scanning is performed by Microsoft Defender for Cloud.
Third-party vulnerability scanning tools can also be used to perform similar vulnerability assessments. Usually also for network devices, web application source code, and other components in your technical platform. Many larger organizations use a vulnerability scanner instead of the built-in vulnerability management tools available in Azure. Reviewing scan results at least every month is a common task in those situations, but newly detected vulnerabilities should be reviewed each week when possible if you’re using a 3rd party vulnerability management solution.
Defender for Cloud Vulnerability Assessments
Start by reviewing the environment settings in Defender, and the settings of each subscription, to verify that the correct defender plans are enabled for the subscriptions you want to protect. Enabling the Microsoft Defender for Servers CWP (Cloud Workload Protection) will provide the necessary information as it’s the cloud native solution for performing vulnerability assessments. Consider using Azure Policy to configure the “Configure Microsoft Defender for Cloud plans” policy to ensure that all future subscriptions are protected by default.
After this is done, follow the recommendations provided by Defender in the “Remediate vulnerabilities” recommendations group. There you’ll see the two main recommendations which are “Machines should have a vulnerability assessment solution” and “Machines should have vulnerability findings resolved”. There might be “unhealthy resources” there which should be investigated. Make an “exemption” for a resource for which the recommendation isn’t applicable for some reason. This should help with increasing the Secure Score percentages, so that you can showcase improvements being made. All while keeping track of, and being transparent about, the exemptions you’ve made.
How Defender for Cloud Assesses Vulnerabilities on Azure Virtual Machines
Microsoft Defender for Cloud uses integrated Microsoft Defender Vulnerability Management capabilities to assess Windows and Linux Azure virtual machines (as well as Azure Arc-enabled servers) through an end-to-end workflow:
- Enable Defender for Servers and select a scanning method: Activate Defender for Servers on your subscriptions and enable either agentless vulnerability assessment or agent-based scanning via the Microsoft Defender for Endpoint sensor.
- Collect OS and software state: For agentless scanning, Defender for Cloud takes periodic snapshots of VM disks and inspects the file system and system configuration out-of-band without impacting the running workload. For agent-based scanning, the installed sensor reports installed packages, OS patches, and runtime state continuously.
- Evaluate against CVE and security baselines: Defender Vulnerability Management correlates discovered OS versions, system packages, and installed applications against known CVEs, CVSS severity scores, and exploitability data.
- Surface findings and Secure Score impact: Findings appear under the “Remediate vulnerabilities” security control (
Machines should have vulnerability findings resolved), grouped by CVE, severity, and affected VM resource. - Remediate, export results, and verify remediation: Teams remediate findings via Azure Update Manager or manual software upgrades, export findings through Azure Resource Graph or Continuous Export for tracking, and verify in subsequent scans that the unhealthy findings are resolved.
Agentless Vulnerability Scanning vs. Installed Vulnerability-Assessment Agent
Defender for Cloud supports two deployment models for VM vulnerability assessment—agentless vulnerability assessment and an installed vulnerability-assessment agent (Microsoft Defender for Endpoint with Defender Vulnerability Management). Both feed findings into the same Defender for Cloud recommendations and Azure Resource Graph tables, and they can be used together:
| Aspect | Agentless vulnerability assessment | Installed vulnerability-assessment agent (Defender for Endpoint) |
|---|---|---|
| How scanning works | Analyzes snapshots of Azure VM disks out-of-band in the cloud without running a scanner inside the guest OS | Runs a lightweight sensor inside the Windows or Linux guest OS to collect software inventory and configuration data |
| Guest VM performance impact | Zero CPU, memory, or disk I/O overhead on the running virtual machine | Minimal runtime footprint inside the guest OS; requires running agent processes |
| Deployment & connectivity | Enabled at the subscription level in Defender for Cloud; requires no guest agent installation, credentials, or outbound VM network access | Provisioned via VM extension or Azure Policy; requires guest agent health and outbound connectivity to Microsoft Defender endpoints |
| Coverage & refresh frequency | Scans OS packages and installed software on a scheduled 24-hour cycle across supported Azure VMs (including stopped VMs) | Near real-time vulnerability detection, runtime process visibility, and support for Azure Arc-enabled servers and hybrid machines |
| Best suited to | Broad, frictionless baseline coverage across Azure subscriptions without touching guest VM configurations | Workloads requiring near real-time telemetry, endpoint detection and response (EDR), or hybrid/on-premises server coverage |
Other Vulnerability Scanning Tools in Azure
The Azure Resource Graph Explorer is another way of identifying vulnerabilities in the Azure portal. This option involves querying the “SecurityResources” logs and looking at the specific subassessment for VM vulnerabilities. It’s possible to download the result as a CSV file so that you can do some final touches with it in Excel.
Here is a query that generates a result containing the current vulnerabilities:
 1securityresources
 2| where type == "microsoft.security/assessments"
 3| where * contains "vulnerability findings"
 4| summarize by assessmentKey=name
 5| join kind=inner (
 6    securityresources
 7    | where type == "microsoft.security/assessments/subassessments"
 8    | extend assessmentKey = extract(".*assessments/(.+?)/.*", 1, id)
 9) on assessmentKey
10| project assessmentKey, subassessmentKey=name, id, parse_json(properties), resourceGroup, subscriptionId, tenantId
11| extend description = properties.description,
12         displayName = properties.displayName,
13         resourceId = properties.resourceDetails.id,
14         resourceSource = properties.resourceDetails.source,
15         category = properties.category,
16         severity = properties.status.severity,
17         code = properties.status.code,
18         timeGenerated = properties.timeGenerated,
19         remediation = properties.remediation,
20         impact = properties.impact,
21         vulnId = properties.id,
22         additionalData = properties.additionalData
You can also query the Azure Resource Graph API to find information on vulnerabilities in your Azure platform. This is also a POST request and with this API you have to supply content that includes the query, but also a list of subscription IDs for which you want to extract the vulnerability data. The URI for this API is:
https://management.azure.com/providers/Microsoft.ResourceGraph/resources
In addition, you can work with vulnerabilities using the Microsoft Defender portal which is available at: https://security.microsoft.com
Important to note that this portal is not the same as the Defender for Cloud service in the Azure portal. Microsoft Defender portal includes a Vulnerability Management feature, which requires the “Microsoft Defender Vulnerability Management Add-on” feature. This feature is available with the “Enterprise Mobility + Security E5” and “Microsoft Defender Vulnerability Management” licenses. This means that you might need to buy additional licenses to use it.
Prioritizing Risks
You should also rate newly discovered vulnerabilities according to risk, so you can prioritize their remediation. Common methods for meeting this objective include using your scanning tool’s own risk ratings or a dedicated risk scoring program like Common Vulnerability Scoring System (CVSS). Vulnerabilities found in applications or services that are exposed to the Internet should have the highest priority, as the probability is highest that they’re attacked. It’s also important to analyze if a vulnerability can be exploited remotely over a network, as some might only be possible to exploit by someone who has logged on locally on a VM. Also prioritize risks in production environments, and any environment that contains sensitive production data that is used for testing purposes.
While Microsoft Defender for Cloud lists vulnerabilities in isolation, NubOps combines Defender vulnerability findings with your Azure architecture and network topology in the same read-only snapshot. Instead of cross-referencing CVE lists against portal blades to check public IPs, subnets, and Network Security Groups, you can see which subscription, resource group, and network path each vulnerable VM belongs to—making it much easier to identify which vulnerable resources are actually exposed to the internet and prioritize remediation based on real risk exposure.
An example of the importance of properly managing vulnerabilities in Internet-facing applications was the zero-day vulnerability in the Java-based logging utility Log4j. Information about this threat was published on December 9 in 2021, but the vulnerability had been exploited by hackers since 2013. The vulnerability (dubbed Log4Shell) allowed hackers to remotely execute code on services that used vulnerable versions of this software component internally. Apache assigned Log4Shell the maximum CVSS severity rating of 10, due to its potential for exploiting millions of servers. Cybersecurity firm Tenable characterized this vulnerability as “the single biggest, most critical vulnerability of the last decade”, and Lunasec described Log4Shell as “a design failure of catastrophic proportions”.
Steps to Prioritize and Report Azure VM Vulnerability Findings
To align with the Microsoft cloud security benchmark and avoid alert fatigue across large VM estates, security teams should follow a structured sequence to prioritize and report findings:
- Assess CVSS severity and active exploitability: Start with the Common Vulnerability Scoring System (CVSS) base score and Defender Vulnerability Management threat intelligence to flag critical/high CVEs and vulnerabilities with known public exploits or active zero-day campaigns.
- Filter by network exposure and attack vector: Elevate priority for Azure virtual machines exposed to the public internet (for example, VMs with public IP addresses or reachable through permissive NSG rules) and vulnerabilities that allow remote code execution without local authentication.
- Weight by environment and data sensitivity: Prioritize production subscriptions, critical Line-of-Business (LOB) workloads, and non-production environments that process sensitive or regulated data.
- Classify findings by remediation track: Separate OS-level vulnerabilities that can be patched in the next Azure Update Manager maintenance window from framework or third-party application vulnerabilities that require vendor coordination, compatibility testing, or compensating controls.
- Export, report, and verify closure: Export prioritized findings via Azure Resource Graph or Azure Monitor Workbooks, track remediation SLAs using KPIs (TTD, TTR, and AWE), and verify in subsequent Defender for Cloud scans that patched VMs no longer report the vulnerability.
Remediating Risks
Remediation is the elimination of a potential threat to a system, often by patching software. Another method of manually remediating server vulnerabilities includes uninstalling the affected software. This approach is only an option if the organization can tolerate the loss of that software. More commonly, a new major version of software may introduce a vulnerability that doesn’t exist in older versions. In these cases, a common solution is rolling back to the latest version that doesn’t have a vulnerability. However, you must also consider the other updates that might be available before deciding to roll back. In some cases, an update hasn’t been applied in a long time, or the vendor doesn’t support an upgrade path. When this happens, it may be necessary to roll back to the latest major version of the software.
Locating software to uninstall requires you to identify installed software by configuring the “Inventory” service for VMs in Azure. This data is then collected to a Log Analytics Workspace, where you can query the “configurationData” log to review the installed software, their updates, and additional information on services. In addition, you need to initiate a dialog with LOB application vendors to determine which updates they support. This process allows you to update the application to a new version or patch the existing version.
Mitigating Risks
Risk mitigation is the process of either decreasing the probability that an incident could occur, or reducing the potential damage of it if it does occur. The goal is to ensure that the organization considers a risk acceptable based on a cost-benefit analysis.
Zero-day vulnerabilities similar to Log4Shell might not have an immediate means of true remediation if an updated version of a software isn’t available. You might have to wait until the vendor releases a patch before you can truly fix such a vulnerability, but you will be able to implement workaround measures in the meantime. Mitigation generally involves making the vulnerable application inaccessible through various means like blocking access to it from the Internet, blocking access to it from the internal network, or making it inaccessible by simply shutting it down. Some vulnerabilities take time to fix, so your immediate priority in mitigation should be to prevent hackers from exploiting the vulnerability. Despite that it might affect your customers, employees, or the organization as a whole which is why communication is a huge part of security incident response processes.
In the case of exploits not based on zero-day vulnerabilities, users may be able to perform their own risk mitigation to a degree. In Azure, for example, users can protect their user accounts as identity is the primary security perimeter when using cloud services. The most important tools include resetting passwords, using Multi-Factor Authentication (MFA), enabling Entra ID conditional access policies, or using physical FIDO2 compatible key storage to strengthen MFA security. Some privileged users should also have to use Privileged Identity Management (PIM), depending on if they have a role such as global administrator or owner in Azure.
Azure Vulnerability Scanning and Reporting
The primary purpose of reporting regarding vulnerability management is to ensure the responsible parties are remediating vulnerabilities over time. These reports should provide details about current vulnerabilities, such as whether they affect critical LOB systems or Internet-facing systems. Reports should also provide information such as the type of vulnerability, its severity, and the software versions that are affected. In addition, vulnerability reports should include aggregate information, such as the total number of vulnerabilities that have been detected and how many VMs they affect. This information is used to decide what level risk the organization is willing to accept, which is called “risk appetite”.
Vulnerability reports should always be based on metrics, so it’s possible to track the performance of the vulnerability management security control over time. This practice is necessary to reduce the number of existing vulnerabilities, and to detect new vulnerabilities in a timely manner.
Common KPIs in vulnerability reports include Time to Detect (TTD), which is the average time between a vulnerability being disclosed and its detection by the affected organization. Security teams should strive to detect vulnerabilities before they’re exploited, which generally means the TTD should be no more than a few days, rather than weeks or even months. The Time to Resolve (TTR) KPI measures the average time needed to mitigate the vulnerability once it’s detected, which determines the extent to which an attack can escalate. The Average Window of Exposure (AWE) is the average time between the public disclosure of a vulnerability and the time when the affected systems are completely remediated.
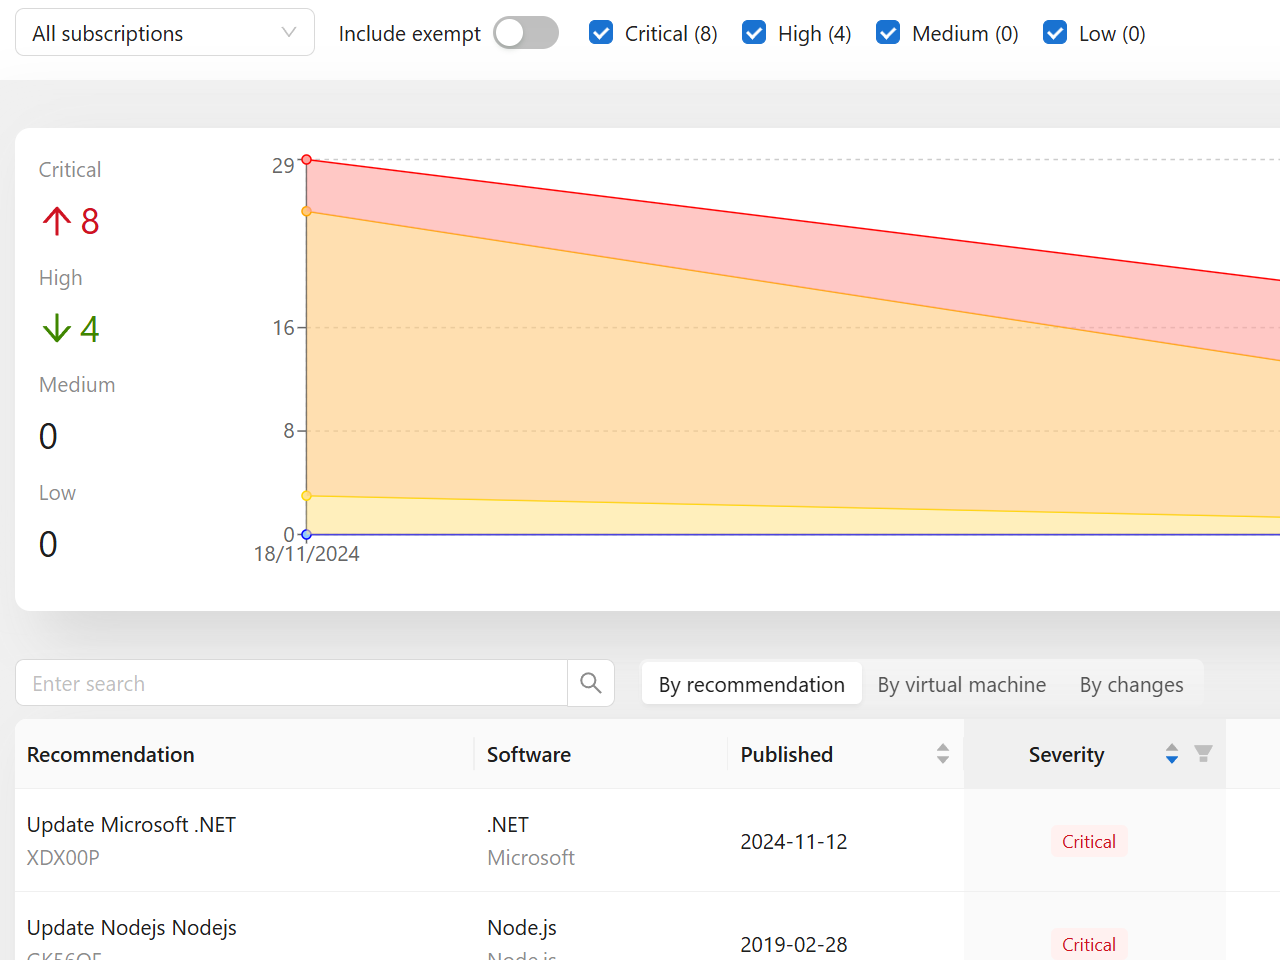
NubOps handles this reporting and trend tracking out of the box. Because NubOps works from point-in-time snapshots that you trigger whenever you need fresh data, teams can compare vulnerability findings between two snapshots—such as before and after Patch Tuesday—to see exactly which vulnerabilities were remediated and what new findings have appeared. You can also track Secure Score and vulnerability counts over time on the Overview dashboard, and export vulnerability findings directly to a Word report to hand over to application owners.
Combining Azure-Native Tools Across the Vulnerability Management Lifecycle
No single Azure service covers every stage of VM vulnerability management by itself. An effective end-to-end process combines multiple Azure-native tools to detect, prioritize, remediate, and report on vulnerabilities across Windows and Linux Azure VMs and Azure Arc-enabled servers:
| Azure-native tool | Lifecycle stage | Primary function in VM vulnerability management |
|---|---|---|
| Microsoft Defender for Cloud (with Microsoft Defender Vulnerability Management) | Detect & Prioritize | Performs agentless and agent-based CVE scanning on Azure VMs, assigns CVSS severity ratings, tracks exemptions, and measures compliance against the Microsoft cloud security benchmark and Secure Score |
Log Analytics (ConfigurationData & KQL) | Inventory & Investigate | Stores and queries installed software inventory, versions, and publishers across VMs to locate affected systems (supports software inventory visibility rather than standalone CVE scanning) |
| Azure Update Manager | Remediate & Verify | Assess OS update compliance via the Windows Update Agent and Linux package managers, orchestrates scheduled maintenance windows, manages reboot behavior, and applies monthly security patches |
| Azure Resource Graph | Prioritize & Export | Queries securityresources assessments and subassessments across all subscriptions at scale and exports vulnerability findings via CSV or REST API |
| Azure Monitor Workbooks | Report & Monitor | Combines Defender for Cloud findings, Azure Resource Graph queries, and update compliance logs into interactive dashboards and trend reports for security stakeholders |
Risk Management
Many vulnerabilities can’t be immediately remediated, requiring either a risk exemption or a formal risk acceptance. A risk exemption should only be valid for a limited duration of time, based on what an owner or vendor can commit to. Assume for this example that remediation requires the application vendor to develop and test a new version of software, which the vendor agrees to do in six months. In this case, the exemption period should be at least six months, triggering a review at the end of that period to determine if the vulnerability has been fixed. If it hasn’t, it may be necessary to escalate the issue to a higher level of authority within your organization.
Risk acceptance might be the only option when an organization uses old End-of-Life LOB applications that a vendor no longer provides support or updates for. In those cases, the risk must be formally accepted by either a manager (CEO, CIO), a business function (Governance, Risk, and Compliance), or similar. Risk acceptance is done by an authority that can make that decision and who is accountable if a security incident happens because the vulnerability is still there. It’s usually required to present information about the business requirements, the security issues, and information about if/how the risk has been mitigated.
Some vulnerabilities may represent an acceptable risk, such as those in “End-of-Support” or “End-of-Life” software. In these cases, the vendor may no longer support the software with updates, typically because the vendor is trying to transition its customers to a new product or service. For example, vendors that have provided on-premise Enterprise applications often develop a SaaS version. In other cases, a vendor may stop supporting its software if it goes out of business or is acquired by another company. It may still be possible to mitigate a vulnerability to the point that it’s an acceptable risk, even while continuing to use the affected system.
Conclusions
Accessing information on installed software for the purpose of vulnerability management is often challenging, largely due to the amount of software typically installed on a VM, and the quantity of data needed to identify and keep track of vulnerabilities. It does require technical knowledge to collect and analyze this information if the organization doesn’t have a proper Content Management Database (CMDB).
Many organizations have difficulties getting the necessary insights into the current state of VM vulnerabilities. Lacking information makes it impossible to determine what should be done. Many security incidents are caused by hackers exploiting old, well-known, vulnerabilities that were present in the organization technical platform without anyone being aware of it. In some cases, an organization might never be able to ascertain which vulnerability made a security breach possible.
Even though most software can be automatically updated, manual updates are also necessary. This requires having to manage, monitor, and track some vulnerabilities over extended periods of time. Zero-day exploits are also a major challenge in vulnerability management, especially as they tend to be detected or exploited out of business hours when key staff members might be sick or on vacation. This ties into security incident management processes.
The solution to these challenges is to develop a mature process for managing vulnerabilities. Key components of such a model include clearly stated requirements, easy access to the necessary information, skilled and well-trained staff, assignment of responsibilities in addressing each vulnerability, and having dialogs with vendors. Having the right tools makes it possible to generate reports automatically, to monitor trends to see if the number of high risk vulnerabilities in the technical platform is decreasing, and to quickly detect and analyze new vulnerabilities. It also helps when handling a security incident to determine if a zero-day exploit vulnerability is present in the technical platform. Still, achieving a mature process requires a combination of all this. It takes time to put in place and to ensure that it’s truly effective in detecting as well as addressing security risks.
This exact operational challenge is why we built NubOps. Instead of maintaining custom KQL scripts, stitching together portal exports, or standing up a full CMDB, NubOps gives Azure teams point-in-time, read-only snapshots that combine auto-generated architecture diagrams, CIS Benchmark and Microsoft best-practice policy verification, and Microsoft Defender vulnerability tracking—with snapshot-to-snapshot comparisons and one-click Word reports for application owners. You can start free while in beta with your own Azure tenant in about five minutes, or explore the live demo tenant (no login required).
Feel free to use the requirements in our Vulnerability Management guideline as a starting point, or use it to review your own requirements. Subscribe to our newsletter here to get access to it, and also to other guidelines that we provide to our subscribers:
Additional Reading on Microsoft Learn
Read more on the topics mentioned in this article by visiting these links:
- Azure Update Manager overview
- Microsoft cloud security benchmark – Vulnerability Management
- Microsoft Defender for Cloud unified Vulnerability Assessment
- Installed software
- The ConfigurationData log
- Azure Resource Graph
- Azure Resource Graph resources
- Microsoft Defender Vulnerability Management
- Azure Monitor API